3.13. IOC Management
The ASGARD Management Center allows you to create and manage your own IOCs. Those IOCs can be used with THOR and Aurora.
What's the difference between IOCs, IOC Groups, IOC Rulesets, and IOC Files?
IOCs: Define specific indicators that represent potential threats. Supports different types of IOC detection, such as filenames like “some_malware.exe”, hashes like "4fef5e34…”, YARA and Sigma rules, etc.
IOC Groups: Organise related individual IOCs into easily manageable groups. For example, you can group various individual IOCs related to a "Mimikatz" attack (such as an IOC that detects the presence of a file called “mm64c.exe”) under a single category.
IOC Rulesets: IOC Rulesets combines multiple IOC Groups into a comprehensive set of rules. With this, you can assemble a set of indicator groups to represent a specific threat scenario. You can also apply your changes to your rulesets for streamlined and efficient threat detection.
IOC Files: Upload files containing your own IOCs that you can later use to add them onto your own IOC Rulesets. Please see THOR Custom Signatures for filename requirements and syntax.
3.13.1. Integrating Custom IOCs
The menu IOC Management gives you the opportunity to easily integrate custom signatures into your scans.
In order to create your own custom IOC Group, navigate to IOC Management > IOCs
and click Add IOC in the upper right corner. Select a name and optionally a description for your IOC Group.
This will open a dialog which guides you through the creation of IOCs.
Every IOC has to belong to one IOC Group. One IOC Group can contain multiple IOCs. And finally, one IOC Ruleset can contain many IOC Groups.
After you are finished with the creation of your IOCs, you will have to apply the changes to the IOC Ruleset. You can do so by checking the box towards the end of the dialog ("Apply changes on all affected rulesets immediately"), or by setting the IOC Ruleset to "autocompile" (this can also be done during the dialog, if you create a new IOC Ruleset).
Once you created a IOC Ruleset which contains IOCs, it can be used for scanning with THOR.

IOC Ruleset in THOR Scan
Anytime you add, remove or change IOCs within one of your IOC Groups,
you have to recompile the IOC Ruleset. To do this, navigate to the
IOC Rulesets page and click the "gear" icon (1) in the Ruleset's row.
You can optionally set IOS Rulesets to "Autocompile".

Compile IOC Ruleset
3.13.2. Scan only with Custom IOCs
Those rulesets can be selected in the "IOC Rulesets" field while creating a new scan job. If a ruleset is selected, the scan will include all custom IOCs included in IOC Groups which have been added to this ruleset. You can also select more than one ruleset.
The THOR scan would be performed with the default settings and the custom ruleset, the default signatures would not be applied.
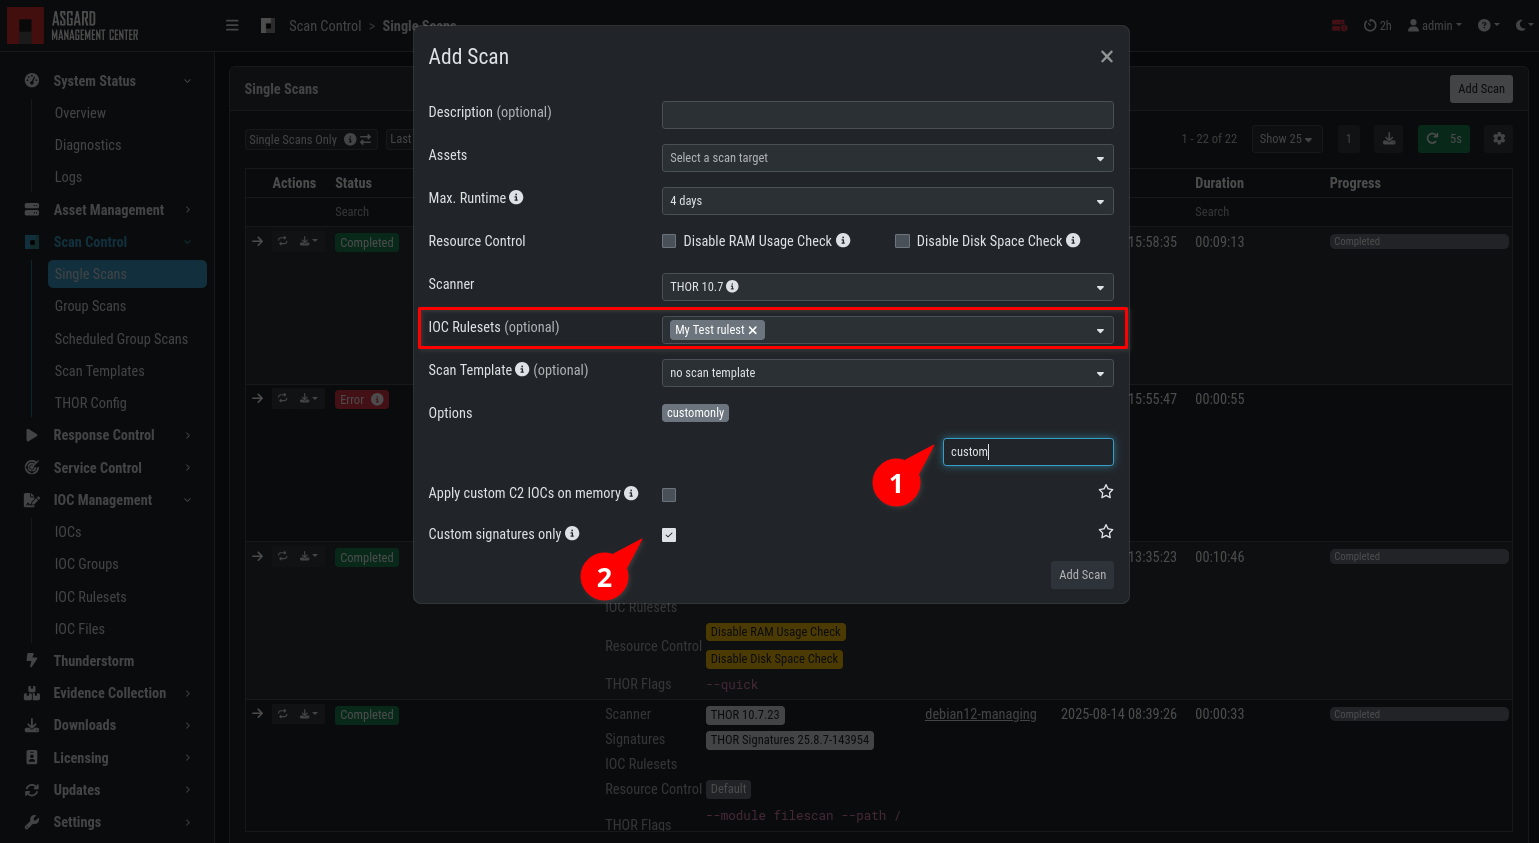
Select Ruleset while creating a scan job
Note
To scan exclusively with the custom ruleset, the flag
--customonly must be set (1,2). Please see
THOR Flags
for more information.
3.13.3. Integrating IOCs through MISP
Note
In order to use MISP events and their IOCs for scanning, you need to link your ASGARD with a MISP first. Please see Link MISP for reference.
ASGARD provides an easy to use interface for integrating IOCs from
a connected MISP into THOR scans. In order to add rules from a MISP,
navigate to IOC Management > MISP > MISP Events, select
the IOCs and add them to the desired ruleset by using the button in
the upper right corner.
There is no default ruleset for MISP. You must create at least one ruleset (see tab "MISP Rulesets") before you can add MISP rules.

MISP events
To create a new ruleset, click Add MISP Ruleset in the
IOC Management > MISP > MISP Rulesets tab. Select a name
and the type of IOCs you want to use in this ruleset. By default, all
types are selected, but there may be reasons for deselecting certain
categories. For example, filename IOCs tend to cause false positives
and may be deselected for that reason. The picture below shows the
dialogue for adding a MISP ruleset. Enable Apply Changes Automatically in order
to compile new MISP events into the ruleset, when they arrive.

Adding a new MISP ruleset
In order to use a MISP ruleset in a scan, add the ruleset in the
MISP Signatures field when creating your scan.

Scanning with MISP Ruleset
3.13.3.1. MISP Attributes used by ASGARD
Since not all the information and attributes in a MISP event are relevant to ASGARD and the THOR scanner, we provide a list of attributes which will be used by ASGARD:
hostname
ip-dst
domain
domain-ip>hostname
domain-ip>ip-dst
domain-ip>domain
filename
filepath
file>filename
file>filepath
file>md5
file>sha1
file>sha256
md5
sha1
sha256
yara
yara>yara
sigma
Warning
Only attributes with the flag IDS set to true will be used
by ASGARD. Please make sure that the flag is set if you are
intending to use certain events/attributes.