7. Advanced Configuration
7.1. Performance Tuning
7.1.1. Overview
The ASGARD agent polls the ASGARD server frequently for new tasks to execute. The default polling interval depends on the number of connected endpoints. In larger environments the polling interval increases dynamically up to 10 minutes for a configuration with 25.000 endpoints connected to a single ASGARD.
Additionally, ASGARD is configured to serve a maximum of 100 concurrent asset connections and 25 concurrent asset streams. Asset connections are short polls from the agent such as answering the question "do you have a new task for me?". Asset streams are intense polls such as downloading THOR to the agent or uploading scan results back to ASGARD.
Requests that exceed the limits will receive an answer from ASGARD to repeat the request after N seconds, where N is calculated based on the current load.
This factory preset behavior insures your ASGARD stays stable and responsive even if your ASGARD's system resources are limited. Furthermore, you most likely can't overload your network or firewalls with high numbers of requests or downloads.
In order to modify ASGARDs performance settings edit /etc/nextron/asgard2/asgard.conf
and restart the ASGARD service.
The default values are:
Value |
Description |
|---|---|
LoadConnMax=100 |
Max. concurrent „Busy Connections" |
LoadStreamMax=25 |
Max. concurrent „Busy Streams" |
PingRateMin=10 |
Polling Rate with 0 connected Assets (seconds) |
PingRateMax=600 |
Polling Rate with 25000 connected Assets (seconds) |
PingRateFast=5 |
Polling Rate for Assets in Fast Ping Mode (seconds) |
These values should work fine in most scenarios – regardless of the size of the installation. However, you may want to decrease PingRateMax in order to achieve a better responsiveness of your ASGARD infrastructure.
7.1.2. Overloading ASGARD
While temporary stream overloads are quite normal, connection overloads should not happen. If they do, either adjust your PingRateMax, your LoadConnMax or both.
ASGARD will indicate an overload with the "Connection Overload line" and the "Stream Overload line" within the graphs in the overview section (see picture below). If an ASGARD is in an overload situation it will postpone connections and streams but will not lose or drop tasks or be harmed in any way. ASGARD will recover to normal load automatically.
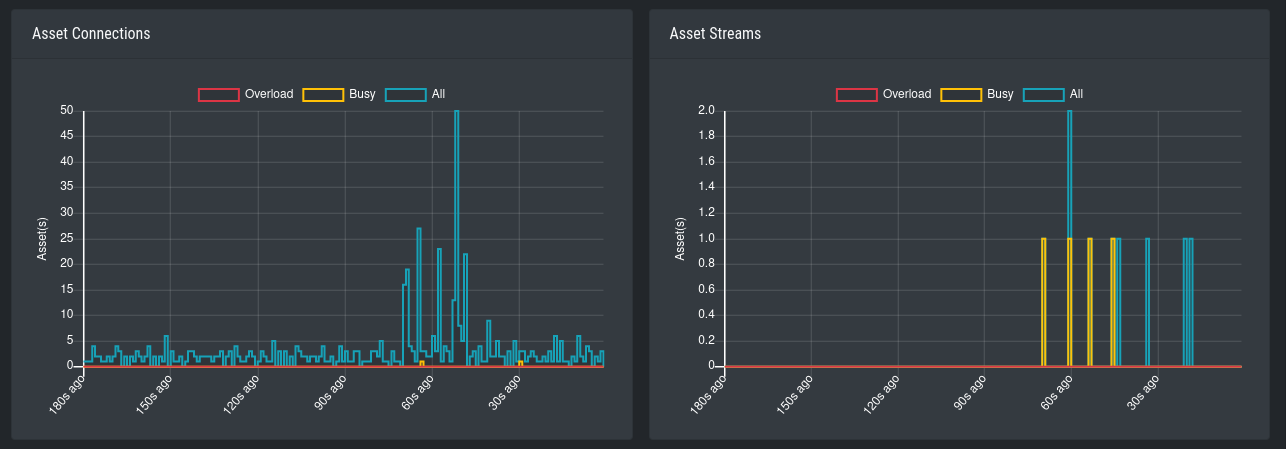
Asset Connections and Asset Streams
Stream overloads can happen temporarily (e.g. if you schedule a grouped scan or grouped task with an unlimited rate). The picture below shows such a normal overload situation that was caused by starting a grouped scan with an unlimited rate. This is the expected behavior. ASGARD will manage the load automatically and postpone streams until the load has returned to normal.

Asset Streams in an overload situation
The "Busy Streams" line indicates the number of streams currently active. s you might have guessed, the picture above was taken on an ASGARD in default configuration where the number of concurrent streams is set to the default value of 25.
7.2. Managing Logs
ASGARD will store all logs under /var/lib/nextron/asgard2/log/
All logs in this directory will be rotated and automatically cleared after 14 months, please see Log Rotation and Retention for more information.
Please copy the oldest log packages to another directory or to a dedicated log server in case you require longer retention periods. Do not modify the built-in rotation settings as this might interfere with ASGARD updates!
Log |
Name |
Rsyslog |
|---|---|---|
Audit |
asgard-audit.log |
Audit Log [1] |
ASGARD Management Center |
asgard.log |
ASGARD Log [1] |
Agent Agent and Service Controller |
agent.log |
Agent Log [1] |
THOR via Syslog |
scan.log |
THOR Log [1] |
THOR via Syslog (Scan Start, Licensing, Completion only) |
subscan.log |
THOR Log [1] |
The logs will always be stored here, even if you have Rsyslog Forwarding activated.
7.2.1. Scan Logs
ASGARD will store all scan logs under /var/lib/nextron/asgard2/scan-results
All Scans will generate two files, thor-<ID>.txt.gz and thor-report-<ID>.html.gz.
The first file will be the raw THOR Scan Log(s) and the second file will be
the HTML Report(s). The numeric value in the file name is the Scan-ID, which
can be found in the the Scan Control view. Please make sure to enable the ID
column, since it is not enabled in the default view.
For Scans which were started with the --json flag, log files are
additionally placed in the scan-results directory and are named thor-<ID>.json.gz.
Please keep in mind, those JSON log files are not being transferred to
any connected Analysis Cockpit.
7.3. Agent and Agent Installer Update
When ASGARD has a new agent version available you can see an indicator
on the Update menu item as well as on the sub menu Update > Agents.
There are two tasks to perform, updating the agents on your assets and
updating the agent installer for all future asset deployments.
7.3.1. Agent Update
If this is the first agent update performed on this ASGARD you might need
to enable the Update Agent module under Settings > Advanced > Show Advanced Tasks.
Then you need to run the Update Agent module. You can do this on a per
asset basis by running a playbook from Asset Management or create a
New Group Task from Response Control, which is the preferred way.
You can roll-out the update in batches by providing labels for each stage
or not select any label to perform the update on all assets.

Example Group Task for Agent Update
Note
The Update Agent module is not shown by default under (Group)
Tasks. To show the group task or single tasks (also inside the group task)
you need to select the Update Agent module from the Module
column. You may need to select the Module column from Column visibility
first, if not shown.
7.3.2. Agent Installer Update
You need to update the agent installer as well, so that newly added assets will directly use the current agent version. This is a manual task as you might have customized your installers. If this is the case you have to repack the agent installers as explained in section Creating Custom Agent Installer.
If you use the default installer without any modifications you can run the following command to update the agent installers:
nextron@asgard:~$ sudo asgard2-repacker
Or you can execute the agent installer update from within the WebUI at
Updates > Agents > Repack Agent Installers at the bottom.

Execute asgard2-repacker from the WebUI
7.4. Creating Custom Agent Installer
ASGARD supports creation of custom installers. Custom installers can be configured in a way that agents show up with a preset label or with a preset proxy configuration.
7.4.1. Creating Custom Agent Installer From GUI
Go to Downloads > Agent Installers > Add Agent Installer.
Edit the properties of the desired installer and generate the installer
by clicking Add Agent Installers. The installers are available at the
downloads page besides the default installers, so best use an affix as distinction.

Custom Agent Installer from the WebUI
You can also delete old Agent Installers which are not needed anymore. Just
select the Installer(s) and Click the Delete button in the top right corner.
7.4.2. Creating Custom Agent Installer From CLI (deprecated)
In order to create your custom ASGARD agent, save the current agents stored in
/var/lib/nextron/asgard2/installer/ to a directory of your choosing and run
sudo asgard2-repacker with one or more of the following flags:
-labels string
Add initial labels to clients comma separated list, e.g. [label1,label2,label3]
-proxies string
Proxies to be used by agents comma separated list, e.g. [proxy1.nextron:3128,proxy2.nextron:3128]
Example: In order to create an installer for servers that initially show up in
ASGARD with the label SQL-Servers use:
nextron@asgard:~$ sudo asgard2-repacker -label SQL-Servers
Your newly generated agents will show up in /var/lib/nextron/asgard2/installer
and will immediately be available for download from the login page. You can store
multiple custom agents under /var/lib/nextron/asgard2/installer/. In this case
all agents will be available for download from ASGARDs login page.
You can obfuscate the default asgard2-agent name with a custom one. The chosen name will generate new agents which can be deployed to the endpoints. These agents will create a service with the chosen name and will have no reference to ASGARD.
-name string
nextron@asgard:~$ sudo asgard2-repacker -name javax
This command will create a new agent for all operating systems. This is specially designed for cases where an agent obfuscation is required.
An installed agent with the name "javax" would look like this:
nextron@asgard:~$ systemctl status javax
javax.service
Loaded: loaded (/etc/systemd/system/javax.service; enabled; vendor preset: enabled)
Active: active (running) since Thu 2020-xx-xx 16:47:22 CET; 5s ago
Main PID: 20048 (javax-service)
   Tasks: 7 (limit: 4915)
Memory: 4.7M
CGroup: /system.slice/javax.service
        20048 /usr/sbin/javax-serviceMar 26 16:47:22 asgard2-dev systemd[1]: Started javax.service.
7.5. Backup and Restore
All of our ASGARD servers come with predefined backup and restore scripts. You can use them to keep a backup available in case something stops working.
Warning
If you are using a Management Center and Analysis Cockpit together, it is advised to create the backups at the same time. This avoids potential data inconsistencies across the two platforms. You can do this via a cronjob on both systems or with an automation tool like Ansible, Terraform, etc.
The same should be kept in mind when restoring your backups. You should always restore the backups on all servers, to avoid getting problems in the future.
7.5.1. Backup
The command asgard2-backup can be used to generate a backup of
all configurations, assets, tags, user accounts, tasks etc., except:
Log files (ASGARD, THOR)
Playbook results (collected evidence)
Quarantined samples (Bifrost)
nextron@asgard:~$ sudo asgard2-backup
Writing backup to '/var/lib/nextron/asgard2/backups/20200427-1553.tar'
tar: Removing leading '/' from member names
tar: Removing leading '/' from hard link targets
Removing old backups (keeping the 5 most recent files)...
done.
If you want to transfer the backup to a different system, make sure to copy the
.tar file to the home directory of the nextron user and change the permissions:
nextron@asgard:~$ sudo cp /var/lib/nextron/asgard2/backups/20200427-1553.tar /home/nextron
nextron@asgard:~$ sudo chown nextron:nextron /home/nextron/20200427-1553.tar
nextron@asgard:~$ ls -l
total 596496
-rw-r--r-- 1 nextron nextron 309217280 Nov  1 12:01 20200427-1553.tar
After this is done, you can use scp or any other available tool to
transfer the backup file to a different system.
Hint
Our recommendation is to run the backup as a cronjob during a time, when no tasks are running or are scheduled to run. The reason for this is that our sample script will stop the ASGARD service before the backup to avoid any inconsistency with the data.
Here is an example script and cronjob entry to create backups on a schedule:
/root/backup.sh 1#!/bin/bash
2BACKUPDIR="/var/lib/nextron/asgard2/backups"
3NEWDIR="/home/nextron/backups"
4date
5
6echo "checking for destination folder"
7if ! [ -d "$NEWDIR" ]; then
8 mkdir $NEWDIR
9 chown -R nextron: $NEWDIR
10fi
11
12echo "stopping asgard2.service"
13if ! systemctl stop asgard2.service; then
14 echo "could not stop asgard2.service, exiting script"
15 exit 1
16fi
17
18sleep 3
19echo "running backup script"
20/usr/sbin/asgard2-backup
21
22sleep 3
23echo "starting asgard2.service"
24if ! systemctl start asgard2.service; then
25 echo "could not start asgard2.service, needs manual debugging"
26 exit 1
27fi
28
29echo "moving backup files to destination"
30mv $BACKUPDIR/*.tar $NEWDIR
31chown -R nextron: $NEWDIR
32
33echo "backup created successfully"
34echo ""
35echo ""
36exit 0
The following crontab entry could be created to run the script every day at 2am. You can edit the crontab of the root user with the following commands:
nextron@asgard:~$ sudo su
[sudo] password for nextron:
root@asgard:~# crontab -e
0 2 * * * /bin/bash /root/backup.sh >> /root/backup.log
Warning
Please keep in mind that the asgard2-backup script is only keeping 5
backups in place. If you want to change this, you have to change the value
GENERATIONS in the file /usr/sbin/asgard2-backup to a different value.
7.5.2. Restore
You can use the asgard2-restore command to restore a backup.
nextron@asgard:~$ sudo asgard2-restore
Usage: /usr/sbin/asgard2-restore <BACKUP FILE>
nextron@asgard:~$ sudo asgard2-restore /var/lib/nextron/asgard2/backups/20200427-1553.tar
Stopping services... Removed /etc/systemd/system/multi-user.target.wants/asgard2.service.
done.
etc/nextron/asgard2/
etc/nextron/asgard2/upgrade2.sh
etc/nextron/asgard2/run_asgard2.sh
etc/nextron/asgard2/server.pem
etc/nextron/asgard2/ca2.key
etc/nextron/asgard2/pre_asgard2.sh
etc/nextron/asgard2/rsyslog-asgard-audit.conf
etc/nextron/asgard2/client.yaml
...
1+0 records in
1+0 records out
24 bytes copied, 3.2337e-05 s, 742 kB/s
Starting services... Created symlink /etc/systemd/system/multi-user.target.wants/asgard2.service → lib/systemd/system/asgard2.service. done.
Note
The version of the ASGARD were the backup will be restored should be the same as the version which was present while the backup was created. If you need an older version of ASGARD, please contact our support team.
7.6. Disable Remote Console Globally
Remote Console on connected endpoints can be disabled centrally by creating the following file.
nextron@asgard:~$ sudo touch /etc/nextron/asgard2/disable_console
To re-enable Remote Console simply remove the created file
nextron@asgard:~$ sudo rm /etc/nextron/asgard2/disable_console